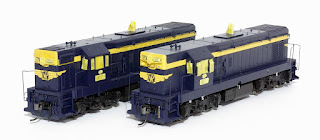
Wednesday, 14 November 2012

The Making of 8002

Hi Guy's

I have always wanted to attempt a major detailing job and I see an Austrains 80 class as a good model that could use a good detail job. I could probably thank Austrains for their 80 class. It bought me back to modeling as I had started modeling BNSF. I still have some of my BNSF stuff but a NSW modeler is what I am now. I guess with all the stuff that we have RTR now it would of been something else but the 80 class bought me back from the dark side so to speak. Anyway here it is pretty much finished;


I have modeled it for a time period from 1992 to 1997 where it met it's end up at Acacia Ridge due to a shunting mishap and was cut up on site. I have photo's of it around this time with a red AC unit on one side and a Blue AC unit on the other. 
 
Now for a few shots of the detailing work, I am not going to great detail as I have done all this from photographs and I have not real messurements to work from;
 
 I use styrene for the Chassis Rails and use ILM  replacement Air tank. I didn't want to cut it in half for the 2 tanks so I just cut a groove into it to present the 2 tanks. I cut a gap between the Battery Boxes and added heaps of pipe work using whatever I had available on my work bench at the time. I added ILM lifting points too. I use 2 for each point so that the body could seperate.
 
 Here is another shot. I used Staples quite a bit for detail as that are easy to work with and strong. I use a staple to hold the park brake chain. I simply inserted the staple through a link of the chain and bent the staple 180 degrees around the chain
 
A close up of the side showing some of the styrene work for the frame. also the ILM staff exchanger that has been added
 
Some of the work that I did to the bogies. I used Kerroby Models 442 class brake cyclinders and loco steps. All the pipe work and styrene work is just scratch
A close up of the bogies
 
This photo was taken by Paul Vanderstelt and shows the bracket on the side of the Bogie that supports a large Damper attached to the frame of the loco. I can only guess that this is to dampen the side ways movement of the bogie. 
 
 
Here is a shot of the model about ready for the paint shop. I had added ILM replacement pilots at the stage and brass air hoses. other little details like the wire steps in the staff exchanger were added. The Air Horns are ILM.
 
This shot shows some of the masking work involved in the weathering process. Cutting the line mask for the panel strips was fine work. It was necessary to show the faded panels of the prototype. I was working on a couple of reverse 80's for Greg Riddel at the same time.
 
Here is a shot of one of Gregs 80's
 
One shot to finish off.
 
Next shot will hopefully have it on a train
 
Cheers Justin Moy 


Monday, 5 November 2012

Lots of Projects

Hi Guy's

Since I have been a live at home dad for just over 3 months now. I thought I would be able to get lots of work done. Well young Hannah has had other idea's but I can say I am now getting on top of things and starting to get some real work done. I have plenty of projects that I have just been plodding along with. With times being hard atm trying to live off one wage, I have been doing up a little bit of stuff to sell, as car rego is just going to kill us. When you start getting power bill of nearly $1000, it is just getting too hard. All I can say is thinkyou to the Government for taxing the ordinary people of Australia into the ground. Anyway looks like I will be back in the work force again very soon.

Anyway enough of a gripe about the world and onto some modelling.

Some Weathering projects

Bendigo models T340
 
Trainorama 948
 
Auscision E Car Set
 
Here is some projects that I have been working on
 
I have been up dating my 5 ILM NLDF's. My plan is to bring them up to the level of detail as some of my new RTR stuff like the Auscision NLKY's and OTM VLEX's. Plenty still to do with new steps and underfloor detail. But one thing I have been working on it making up code boards and L7 logo's. These are the first trials shown. These are basically Photographs of real boards that I have sized down the glue straight on the Van. It is good to have a pre-weathered L7 Logo to use. Anyway updates as they come.
 
I have been working on Super Detailing this Austrains 80 class. What started as a project to get rid of the box around the weight above the fuel tank has spiralled out of control. This will be 8002 when finished. More updates as they come.
 
Cheers Justin Moy  


Friday, 12 October 2012

NGTY

Hi Guy's,

Just a quick one. I have been working on heaps of stuff lately which I will detail here in my blog soon. As I have become a live at home dad, my 5 month daughter  Hannah keeps me pretty busy but I am starting to find some time to do a bit of work and balance my time. Anyway I got a few of the Auscision NGTY wheat hoppers out and had a play and come up with this:

 
I still have a few things to do. I will put a light dusting of rust on the cat walk to dull it down a bit.
Here is a shot with one of my Auscision NGPF's;


When I took this shot I still hadn't painted the wheels, Here is a couple of shots of it in the workshops;


Anyway the list of stuff that I am working on goes on. I have a couple of AR kits 45's been super detailed, 6 OTM Lourver Vans getting redone as Banana Vans, 3 Austrains 80 class Weathering jobs, 5 Trainorama 44 class weathering jobs, 4 Auscision E Cars Weathering Jobs, 2 BRM T class weathering Jobs. Now this is just my stuff and no mentioning stuff I have here for everyone else.

Anyway Cheers and Happy modelling

Justin Moy

Wednesday, 12 September 2012

Beyond Bulliac

Hi Guy's

I hope some of you have memories of this great layout? I for one do and I get to see a small part of this layout which is housed on display in the Club Rooms of the Taree & District Model Railway Club Inc. The Number 2 Module is own by Greg Riddel, one of the four guy's that built this layout. As the number 4 & 5 Modules of this layout are now dismanteled, we will never be able to see this layout running again. At least there is a part of it here that I can set up a train and take some shots. So here they are;

Here seen running through Beyond Bulliac is 6331 frieght with solo 44217. This train was often run on weekends as the overload to 6233, the paper train. I forget to light up the signals when I edited this photo.
 
4499 is passing through on the main line on a down freight as 44239 pauses in the siding at Beyond Bulliac. It is about to shunt this AOOX onto it's train number 6372. The AOOX was left here to deliver power poles to the local power provider. As soon as the other train has cleared it will continue with the shunt
 
 
Hopefully soon I will take some more shots in the yard
 
Cheers Justin Moy


Thursday, 16 August 2012

Bendigo Rail Models T Class

Hi Guy's

Here is a series of photo's of my work on two Bendigo Rail Models T Class. They were pretty straight forward in the end. I studied plenty of Photo's of the Prototype on a few web sites before getting the Air Brush out. Anyway here is some shots starting with the finished product.


This next shot is shows the masking work that I did. I masked the windows and number boxes plus the number plate.


I this next shot it shows the added of two different colours with the Air Brush. At this stage I added a little dusting of Floquil Zinc Chrome Primer and Rail Tie Brown.


I forget to Photograph the next step which was the adding of a few more colours. Floquil Rust, Mud, Grime and Grimy Black were all used.

The Last step was to get the paint brush out and paint all the little details and high light areas.

Here is another photo of the finished project


Also here is some work I am doing on some Auscision E Cars


The finished Product


Cheers Justin Moy


Monday, 13 August 2012

OTM VLEX weathering

Hi Guy's

This is just a case of posting up some shots of works in progress. Been weathering 3 OTM's VLEX models and just took some photographs to see how they look. At this stage I think they are a little too dark. I could of faded the paint work a little more I think? Anyway here is the shots.


The two featured here were originally painted in VR. I replaced the doors on one and repainted the roof on the other giving them the Vline Livery. The only down full is the Vline decal work. Like soldering, decalling is just something I am not good at. 

The other is still VR but I still need to do the brush work on it. I look forward to getting some more of these in the next run. With the standard of all this new RTR coming out I am going to be rid of my Trainorama VLCX models as they are just not up to the standard of these OTM VLEX models. I am going to kit bash one of these into a VLCX for now with the hope that someone releases a better VLCX model that will be able to run with these 56 foot Vans.

Cheers Justin Moy

WSC Sleeper Wagons

Hi Guy's

Been going through some photo's and trying to make up some more wagon data packs. I have been working on a pack for the WSC sleeper wagon. I have two models of these, I think the company was Train Master and they were made in India. I have had them for a few years now.

Most the detail on them was pretty good, but I did replace the Bogies and shunters steps. They make a great weathering project so I thought to post a couple of shots here on my Blog to hopefully get some of you inspired? I weathered this one not long after they come out. I thought I did a pretty good job at the time but they could use some more I think!


Here is some scans taken at Taree about 11 years ago. I think the wagons were headed for the Northern Rivers Railroad bought for their bogies to go under some of their re-gauged QR Coal hoppers.


Looking at these shots I think I should go a lot darker with the rust marks. Anyway I look at many of my weathering jobs with the question what else needs to be done?

Cheers Justin Moy