Monday 18 June 2018

NLCX 5209

Hi Guy's

Well some of you may remember my first ever Blog. I related to my work on a Ian Lindsay Model's CLX/NLCX Kit. I had placed a On Track Models Chassis from one of their LLV RTR Models under the ILM's CLX Kit. I never really finished that model but it is now painted waiting weathering. It looked good at the time as there was no real better options to Model a NCLX.

Over time Auscision announced that they were working on their JLX/NLJX product so I shelved the ILM's Kit waiting to see what they would come up with. It was pretty dam good so my thought process started on converting one of these into a NLCX. So what I can say, it was a success. The Auscision model addressed many short comings of the ILM body sides. The most obvious being the off centre doors. It also introduced rivet detail in the body which is simply achieved with injection moulding. Anyway here is the end results-

Very Happy with it


Here is a photo essay of how-
It started out as the Auscision NLJX


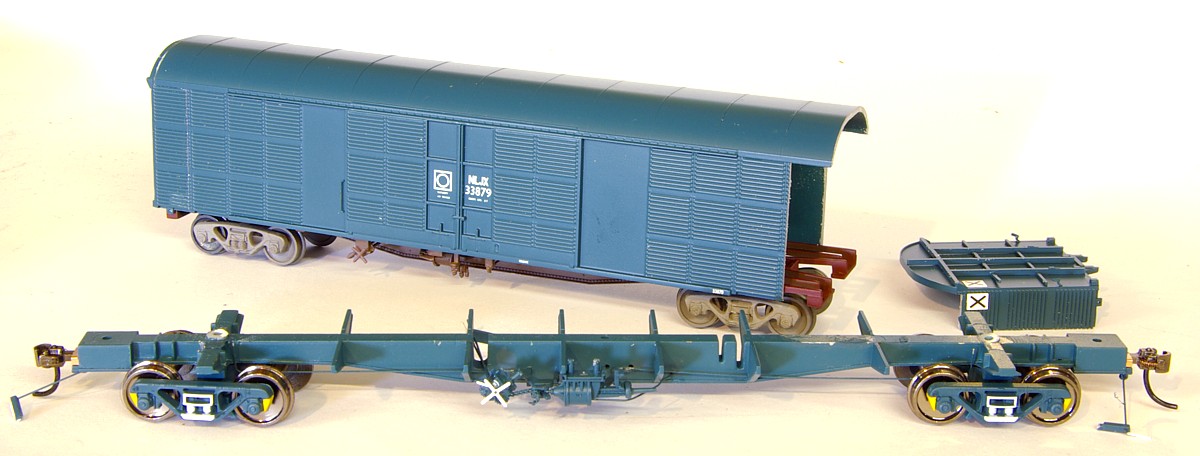
It was sacrificed and a OTM's LLV. The LLV body may live on as a farm shed? The chassis from the NLJX will live on as a NCRX when I get around to it. So for two items of rollingstock I will be getting two back in other forms and a farm shed.


The Chassis and Floor were both used from the LLV


A credit to the manufacturers of these, When the JLX was cut down, the LLV floor fit under perfectly with not gaps what so ever. 


Working out the height 


Next to the ILM version


ILM on top. This shows the issue with the doors being off centre


The Prototype


I petty much left the under floor as OTM. My aim was to make the model look pretty much how it would look straight out a OTM's or Auscision Box minus the weathering


I could not ignore some missing detail around the underfloor so this was added using styrene strip.


I find one of the easiest methods for adding styrene is to spot it with super glue and handle as a long piece. I then cut it down to size with a sharp razer blade after the glue has set. I would do three at a time cut to different lengths as to give room to work and when stuck, cut to size. The off cuts were then reused for the next three till they were too short to work with.


Cutting these supports to the right shape


The lifting supports need a few different shapes to get it right.


Other than the styrene work, the only other parts added that are not from the original models was the Brass Air Hoses and the brake rigging support just next to the brake wheel. That was from AR Kits brake parts. The Bogies are from AR Kits with Auscision P88 Wheels fitted. The coupler is a Kadee 58. The uncoupler bar is from the LLV. I used a Kadee red washer to adjust the height and give the wheels a little more clearance from the underfloor. I also hollowed out the cut off's on the 2CG Bogies as an added detail. SEM brake shoes have been added to the bogies.


AR Kits LLV brake support cut down. The Ladders are from the NLJX


With the ILM


Primed with Model Master Primer


Weathering base coat applied using Tamiya Enamels


Sitting next to a weathered NLJX


After applying some washes using the Tamiya Enamels in washes of turps. Only after the model was left sit for a couple of weeks to set the original weathering coat.


Some Prototype shots from Norm Bray's Flickr site used with permission


I based my weathering on 10074 but numbered it 5209 to make decaling easier.
I hate decaling


Anyway that is pretty much it


Cheers Justin Moy


Saturday 16 June 2018

SDS WOAX

Hi Guy's

Got my hands on one of these the other day and I must say I am impressed.

Usually when I get a new ready to run wagon, first thing I do is change the bogies over to that from AR Kits or SEM's. The bogies that SDS are producing are excellent and match in with my kit bogies really well. I find that many of the RTR bogies are two thick and the wheel journals stick out to far. This to me stands out among a rack of wagons esp. when you look down on them at 45 degrees. As I am in the process of changing everything over to P88 wheels, the wheels on this are not an issue.

They come with KD58's as well so I don't need to change them out either. Pretty much all there is to do is weather.
The detail with the doors and ends is excellent

I throw a couple of washes over just to show up some detail
A per production shot showing parts that can be interchanged during manufacture


There is a bit of an issue with different coloured yellows between Manufacturers but weathering will mask this. I don't know who maybe right or wrong, I don't really care. They all faded and weathered over time. This would only be of note if you were running them straight out of the box.

Cheers Justin Moy


AR Kits NOBX Kits x4


Hi Guy's

I travelled down to Sydney last weekend and attended the Annual Model Railway Show that the Epping Model Railway Club puts on. This year at Rose Hill Gardens Race Course in Sydney. It was a great show and I believe it will be or is the premier exhibition going ATM. It was a great day and I really did enjoyed catching up with many friends throughout the hobby. It was good to get out as home has been a challenge with a big Cancer scare involving my Wife Amanda really upsetting the apple cart. Thankfully it appears they got it all and we can get back to some normality.

One thing that I did notice in the Auscision Cabinet was two test shots of HO scale BDX/NOBX open wagons. They are a good choice to produce Ready to Run as they were plentiful on the NSWR system dating back to the Steam Days and there is still some heavily modified versions running today as container wagons and infrastructure wagons such for concrete sleeper traffic. It is a bit hard to tell but the underframes are much the same as built.

This raised a question in my mind? I have about 11 AR Kits NOBX wagons in various stages of Kit Build. What to do? What strikes me with the Kit is that it has allot of potential to be a great looking model. For when they were first produced by AR Kits in the 80's, the detail in the sides was really good. The rib detail inside the body was a real stand out. Today this detail is finally becoming standard among the producers and is expected when a new model comes out and I am sure the Auscision BDX/NOBX project will have this as have the AOOX/NODY projects of past.

This brings me to mine. I have pretty much completed 4 AR Kits NOBX's. My goal with these was to bring them up to a detail standard that could have them running around with my abundance of RTR Rollingstock. The detail on RTR from most manufacturers is pretty hard to match by most modellers and I struggled with these. I started these about 3 years ago. Doing a bit here and there. I did some of the work at work so to speak. I did allot of sleep over shifts at work and when I couldn't sleep I would have a little modelling tool box and set up and do some modelling. Just the building as I couldn't use paints on site.

One big aim was to build up the Bolster area as this is one area that is real deficient. This was all styrene work and while I was at it the angles of the fish belly was corrected. There was allot more brake detail added using AR Kits and SEM's parts. Shunters steps and grab irons were added using brass etch ladder and wire. Also I added the 4x2 floor board detail inside the wagon by scribing 15 thou styrene sheet and the end boards using 6x2 styrene. Later I worked out that I should of used 8x4 for the ends as there is only 6 boards on each end and not 8. Anyway photos explain things better than I can so here we go-
 The Weathering on this NOBX was based around the wagon below. I also added extra door detail such as the door that had been replaced with that from a type 2 NOBX. It has extra tie rails on it. So far I have only done the type 1 as AK kits produced and haven't attempted the type 2. The different tie rails are probably the most notable difference but when you get down to it the underfloor has many differences which I am not going to go into till I work on one. It will be interesting to see if Auscision do both types and the CCX version too?


The difference with adding the bolster detail and correcting the fish belly can be seen in the next photo. Adding the bolster detail gets rib of the air that you can see above the bogie. This is a detail that is catered for in most RTR models coming out.
It makes a difference
A shot showing the straight forward kit against it


Here is a few showing the extent of the styrene work and detailing


This I added the detail to one that was built and painted previously


Now for some photos of the finished products


All four


It was an enjoyable project. Anyone looking for a modelling project to test their skills in this environment of RTR it comes out looking the goods. I will most likely finish the other several that I have and I don't think I will be replacing them with Auscision ones. Maybe I will change my mind when I see the RTR first hand. Anyway at $32 or there about for the kit, It is a cheaper option as long as I don't add labour cost to it.

Cheers Justin Moy