Tuesday, 4 February 2014

Weathering On Track Model's VLCX

Hi Guy's

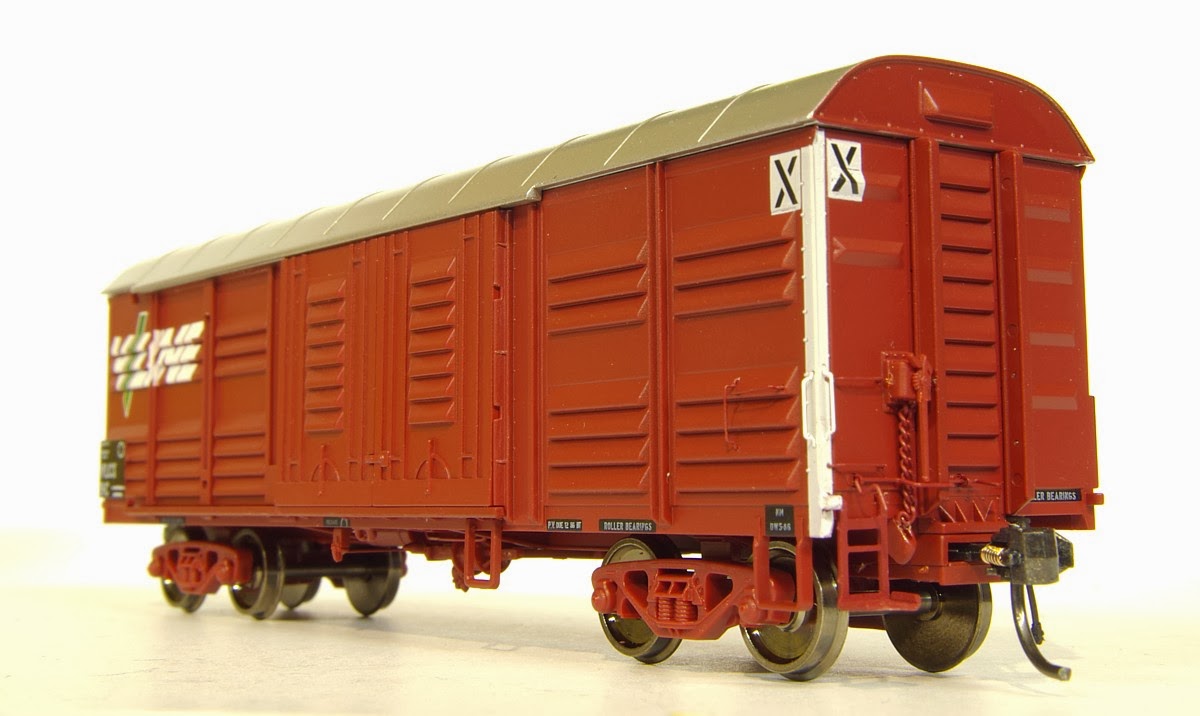
Just had a little bit of a play with one of the new On Track Models VLCXs. I made a couple of Modifications mainly to make it fit in with my fleet of wagons.

I will do a little bit more work to the roof. The roof would be the hardest thing to weather up on these Vans. It is hard to get the right look. I masked up and resprayed the Red to give it a faded look which was Floquil Zinc Chrom Primer with a little bit of Floquil Aged Concrete mixed in. Most of the rust spots are Floquil Tuscan darkened with a little Floquil Engine Black.
 
The Modifications that I did are as follows;
 
I removed the step under the doors. In my era there wasn't many VLCX left with this step in place. They were a bit more common on the first series of VLCX's(1-135) with the timber floors but the ones with steel floors, they were rare to have these steps. These steps were probably a feature of all the vans when first built. The pack that I got which was VLCX-3 had one of first series and two of the later series (136-660). On the first series one I am going to leave the step on.
 
One my 2 second series Vans I have also removed the striker plate from above the Couplers. On the second series vans this doesn't seem to be a feature. I have left it on the first series van as they are on them but probably not as large as featured on the model. I have also moved the coupler box in by about 1.2mm. It is now basically flush with the end of the Vans.
 
I added KD number 58 couplers.
 
I added a mix of AR kits and SEM bogies to the Vans as I have standardised my fleet using only these bogies. 
 
Anyway that is a bit of look at these nice Vans
 
 
Cheers Justin Moy


Monday, 3 February 2014

Austrain's 442s1

Hi Guy's

Just a quick one. I just finished off weathering and detailing an Austrain's 442s1. There wasn't a lot to do but with a little bit of work it finished up to be a nice looking loco.

 
The detail work that was needed was the detailing of the bogies with Kerroby Models Loco steps and Brake Cylinders. I used an ILM's Pilot infill kits to mound the KD's and also added a little bit of styrene around the Coupler pockets. I added Brass Air Horns and Air Hoses. These were Mains West Detailing parts. I also added new MU plugs and the 3rd Dummy Plug. These was Brass parts from Mains West as well. Other than Weathering the only Paint work was correcting the blue lines on the Pilots. The model was wrong with the lines being straight. They are curved and follow the lines on the nose.
 
Standing with one straight out of the box
 
I enjoy weathering paint schemes such as these.
 
Anyway that is 442s1 ready for service
 
Cheers Justin Moy


On Track Model's VLCX

Hi Guy's

Just a quick on. Here is some shots of the recently released On Track Model's VLCX. They look pretty good and are on par with their VLEX model done a couple of years ago. What I like is the fact that they match so they can be run together without any unsightly difference in the roofs or body panels.

Here is a couple of shots;


Straight out of the box
 
A good selection of Doors are available
 
With the doors open showing the interior detail which is excellent and on par with the VLEX's
 
VLCX on the Left/ VLEX on the right
 
Standing with a weathered up VLEX.
 
They are another fine model from On Track Models. I have been studying shots of the prototype and I will be making a few little mod's to mine which I will show in a later Blog. It will be good to see what Auscision come up with their VLCX/VBBX project. If they are better than these, they will be a super model.
 
Cheers Justin Moy


Sunday, 10 November 2013

44237

Hi Guy's

I have just finished this Austrains 44237. I have had this one sitting around for a long time in various stages of work. But I had a few of these Jumbo's on the bench so I decided to bite the bullet and finish it off. This was a major detailing job similar to my 8002 that I have Blogged previously. I am not going to go into this detailing. My main aim of this Blog is to show it off.

I have detailed this jumbo up to a reasonable standard. There are other things that I could of done but there is a point that I have to stop or I will never get anything finished. Here is a bit of a Photographic essay of the work done to this loco.
I realised I made a mistake here. I did both pilots the same. The pipe work at the top of the pilot is a mirror image on the other end of the loco as the pipes only run down one side of the loco. When I do the next Jumbo I will do them the other way around and swap one pilot of this loco
Some pipe detail on the bogies. On my 8002 project I cut up parts of the bogies so that I could get all the wheel Journals in the right locations. I haven't done that with this one and that will bug me for a while. I may have to revisit this at a later date as I now have many spare side frames to play around with. So the fact that there is 2 Speedo locations on the bogie will get fixed one day.
The pilot fitted with KD 58 Couplers. For the Paintwork on this Loco, I resprayed the Red with a coat of light Grey. I let it harden for a couple of weeks then sprayed a faded coat of Railey's Candy Red with a little bit of Floquil Grime mixed it. I then went about lightly sanding the paint to try and give the effect of years of steam cleaning on the paint. Areas that I wasn't happy I went over with some of the light grey with a brush.
This was the result of the sanding back
 
For the staff exchangers I used ILM 80 class exchangers. The Jumbo Staff Exchanger Pocket is a bit wider then the 80 class so I widened the Exchanger to suit as seen in these pictures
 
 
This picture was the loco at the stage of decaling and finishing off the weathering
Most the detailing work was done. There was just the hand rail and grab iron detail to add.
 
This is the finished product. I will go into more detail when I do some more Jumbo's. I have put cab interior detail in this Jumbo. I used some spare parts from an Auscision 422 class that I had lying around for the interior. I will need to construct interiors on future models and also the update the 3 other Jumbo's that I have running so I will detail this work then.
 
 
On the number 2 end there is no crew and the blinds are pulled most of the way down. In the early 90's there was a ban on Jumbo's leading by the number 2 end.
 
A coupe of the Prototype thanks to Dave Porter


One to finish off
 
 
Cheers Justin Moy


Trainorama 42 class

Hi Guy's

Just a quick Blog. I have just finished weathering up 6 Trainorama 42's for a friend. That brings to the total of 8x 42 class loco's that I have weathered. Anyway it was a straight forward weathering of these. It did require a bit of research to work out how to go about it, but there was no need to modify the Loco's in anyway which is good. Anyway some photo's

This is 5 of the units numbered 4202-4206.
4201 I had returned to it's owner some time ago for inspection.
 
Here is a bit of a photographic essay of the work involved
This was the first mask. The Aim was to darken the grill area as well as the underframe and roof
This is the result. One thing that I had to do was go over the grills with a razer blade and remove any paint that was no required. This was a case of studying photographs and seeing how they weathered
The tape removed
5x 42's taped up
The next step was to mask and spray a faded coat of Tuscan. This is basically some Railey Paints Tuscan with a bit of Floquil Grime mixed it. This is an important step and the most time consuming. There is an Auscision 422 having the same steps in this picture. Getting the Tuscan to look the right tone is the hardest step but this really does make the weathering look good in the end
These 42's have had the paint faded and are ready for the next step. I need to leave them for a while and let the paint go hard. This could take a couple of weeks. The final steps to the weathering require washes of Floquil Paint mixed with Turps. The paint if not fully set would simply come off in this process.
This is 4201 at the end of the process. I have given this one a light dusting with Floquil Rail Brown along the lower half of the body but all the wet brush work has done it's job to highlight some of the detail like around the nose door.
 
Anyway here is a few shots of the finished products


Here is a couple of shots supplied by Bob Richardson to assist with the research


Cheers Justin Moy